Lab 4 - Toolchain. GOTO
Task: C: GOTOs
For the algorithms below, write C code without using:
- function definitions/calls (except for
scanf()andprintf()) elseforwhiledo {} whileifconstructs containing return- nested
ifstatements
The only permitted statement within an if construct is goto.
In other words, all the code must be written inside the main function, and the control flow modification (jumping to another code area) is done only through sequences like if (condition) goto label; or goto label;.
- Implement an algorithm for finding the largest element of an array using C code and the above constraints.
The skeleton for the code is in
support/vector_max/vector_max.c. - Implement binary search using C code and the above constraints.
The skeleton for the code is in
support/binary_search/binary_search.c.
WARNING: We reiterate that the use cases of the goto statement are limited. These exercises have educational value to get you accustomed to jump instructions that we will use in assembly language development.
If you're having difficulties solving this exercise, go through this reading material.
Task: Reverse: Old hits
Using Ghidra, as well as gdb, analyze the old-hits/support/old-hits binary and obtain the secret information.
The program generates a random value and asks you to guess another value calculated based on the aforementioned one.
If you're having difficulties solving this exercise, go through this reading material.
Note: The following error can occur when running the executable if you don't have libcrypto.so.1.1 installed on your system:
./old-hits: error while loading shared libraries: libcrypto.so.1.1: cannot open shared object file: No such file or directory
To install libcrypto.so.1.1 run the following commands:
wget http://nz2.archive.ubuntu.com/ubuntu/pool/main/o/openssl/libssl1.1_1.1.1f-1ubuntu2_amd64.deb
sudo dpkg -i libssl1.1_1.1.1f-1ubuntu2_amd64.deb
rm libssl1.1_1.1.1f-1ubuntu2_amd64.deb
C basics: GOTOs
A less addressed concept in C tutorials is the goto statement. Using the goto statement, a program can jump to intermediate points within a function. These intermediate points are called labels.
Syntax
Syntax-wise, a label consists of a name followed by the character :.
Code example:
##include <stdio.h>

int main()
{
   int i, j, k;
   /* some code */
do_some_work:
   /* some other code */
   work();
   if (any_work())
       goto do_some_work;
   /* some code */
   return 0;
}
The program executes a job through the work() function.
In case there are other unfinished jobs, the program execution jumps to the label do_some_work.
do_some_work marks the point in the program where the processing of a new job begins.
To jump to this point, the goto statement followed by the declared label name is used.
Through different combinations of if statements and goto statements, other C instructions such as else, for, and while can be emulated.
The example code given above could be replaced with do { … } while ();:
##include <stdio.h>

int main()
{
    int i, j, k;
    /* some code */
    do {
        /* some other code */
        work();
    } while (any_work());
    /* some code */
    return 0;
}
The "WHYs" of goto
Not only is this instruction missing in many C tutorials, but recommendations are made against using it because it often leads to obfuscated code (difficult to understand, maintain, and debug).
However, there are cases where it is used.
In the Linux kernel code, for example, goto instructions are used as a form of try-catch from higher-level languages (such as C++, Java, C#, etc.).
Example:
int process_data_from_mouse_device(...)
{
    int err;
    int x, y;

    /* >>try<< instructions */
    err = init_communication_with_mouse();
    if (err)
        goto error;

    err = get_x_coord_from_mouse(&x);
    if (err)
        goto error;

    err = get_y_coord_from_mouse(&y);
    if (err)
        goto error;

    err = announce_upper_layers_of_mouse_movement(x, y);
    if (err)
        goto error;

    err = close_communication_with_mouse();
    if (err)
        goto error;

    return 0;

    /* >>catch<< instructions' exceptions */
error:
    print_message("Failed to get data from mouse device. Error = %d", err);
    return err;
}
This code attempts to process data coming from a mouse and pass it to other higher-level parts of the kernel that could use it. In case an error occurs, an error message is displayed, and the data processing is terminated. The code seems correct but is not complete. It's incomplete because if an error occurs in the middle of the function, communication with the mouse is left open. An improved version would be the following:
int process_data_from_mouse_device(...)
{
    int err;
    int x, y;

    /* >>try<< instructions */
    err = init_communication_with_mouse();
    if (err)
        goto error;

    err = get_x_coord_from_mouse(&x);
    if (err)
        goto error_close_connection;

    err = get_y_coord_from_mouse(&y);
    if (err)
        goto error_close_connection;

    err = announce_upper_layers_of_mouse_movement(x, y);
    if (err)
        goto error_close_connection;

    err = close_communication_with_mouse();
    if (err)
        goto error;

    return 0;

    /* >>catch<< instructions' exceptions */
error_close_connection:
    close_communication_with_mouse();
error:
    print_message("Failed to get data from mouse device. Error = %d", err);
    return err;
}
In the improved version, if an error occurs, a cleanup part is also performed: the connection with the mouse will be closed, and then the code will continue with the general error handling of any errors in the program (displaying an error message).
NOTE: Why does this course/lab cover such a topic?
When we study assembly language, we will notice that a large portion of the workflow resembles a program made up of goto statements, even though most instructions of a high-level language, such as C, are nonexistent. Thinking in terms of goto statements and including them in our code prepares us for working in assembly language.
WARNING: In any other situation, this form of programming should be avoided as much as possible.
Guide: C: Warm-up GOTOs
- Modify the source code in the
support/bogosort/bogosort.cfile, by replacing thebreakinstruction with agotoinstruction (Bogosort). - Similarly, replace the
continueinstruction insupport/ignore_the_comments/ignore_the_comments.cwith agotoinstruction without changing the functionality of the code.
WARNING: When writing code with labels, please adhere to the following indentation recommendations:
- Do not indent labels. Keep them aligned with the left margin of the editing screen.
- Each label should be on its own line. There is no code on the same line as the label.
- Do not take labels into consideration when indenting the code. The code should be indented in the same way whether there are labels or not.
- Leave a blank line before the line containing a label.
NOTE: Situation where
gotomay be useful.
If you're having difficulties solving this exercise, go through this reading material.
Reverse engineering
Ghidra is a useful tool for investigating binaries and reverse engineering.
Disassembly
The disassembly process is used to obtain a file containing assembly code from a binary file.
This process is always possible because the machine code specific to the processor has a direct correspondence with the assembly code.
For example, the operation add eax, 0x14, which adds 20 to the value in the eax register, is always represented using the binary code 83 c0 14.
Decompiling
The Ghidra program can be used even for decompiling code. A decompiler can be used to obtain the source code in a (relatively) high-level language, which when compiled will produce an executable whose behavior will be the same as the original executable. In comparison, a disassembler performs an exact translation of an executable program into assembly language because there is a 1:1 relationship between machine code and assembly language.
Guide: Online C Compiling
An interesting tool to observe how C code translates into assembly language is Compiler Explorer.
- Go to Compiler Explorer.
- Load the "sum over array" program from the examples (accessible using the load button, shaped like a floppy disk).
- Make sure
x86-64 gcc 4.8.2is selected underCompiler:. - Use the option
-m32(inCompiler options) to display code in 32-bit assembly language (as opposed to 64-bit by default). - If you see the message
<Compilation failed>, add the option-std=c99. - Initially, the code might be quite cumbersome.
To make it more human-readable, add the option
-O2to the compilation options (Compiler options). - You may notice the presence of symbols like
.L3:and.L4:. These represent fixed points in the program, labels, quite similar to what is found in C. - Go through the compilers corresponding to the following architectures one by one: ARM, ARM64, AVR, PowerPC.
Note: for ARM, ARM64, and AVR, you will need to remove the previously set -m32 flag. You can observe how the generated code differs from one architecture to another. - Also, try the following compilers:
clangandicc. As you can see, even though it's the same C code and the same architecture, the generated code differs. This happens because each compiler can have a different optimization and code generation strategy.
NOTE: clang is an open-source C/C++ compiler. It is often used in IDEs due to its very suggestive compilation error messages.
NOTE:
iccis the C/C++ compiler from Intel.
Write the following code sequence in the Code editor area:
int simple_fn(void)
{
    int a = 1;
    a++;
    return a;
}
Observe the assembly code when the compilation options (Compiler options) are -m32, and when the compilation options are -m32 -O2.
Notice the effect of optimization options on the generated assembly code.
Guide: Ghidra Tutorial: Decompiling
In this tutorial, we aim to show how to analyze the functionality of a simple binary that prompts for the input of a correct password to obtain a secret value.
WARNING: In order to run Ghidra, access a terminal window and use the
ghidracommand.
Initially, when we run Ghidra, a window will appear showing our current projects.
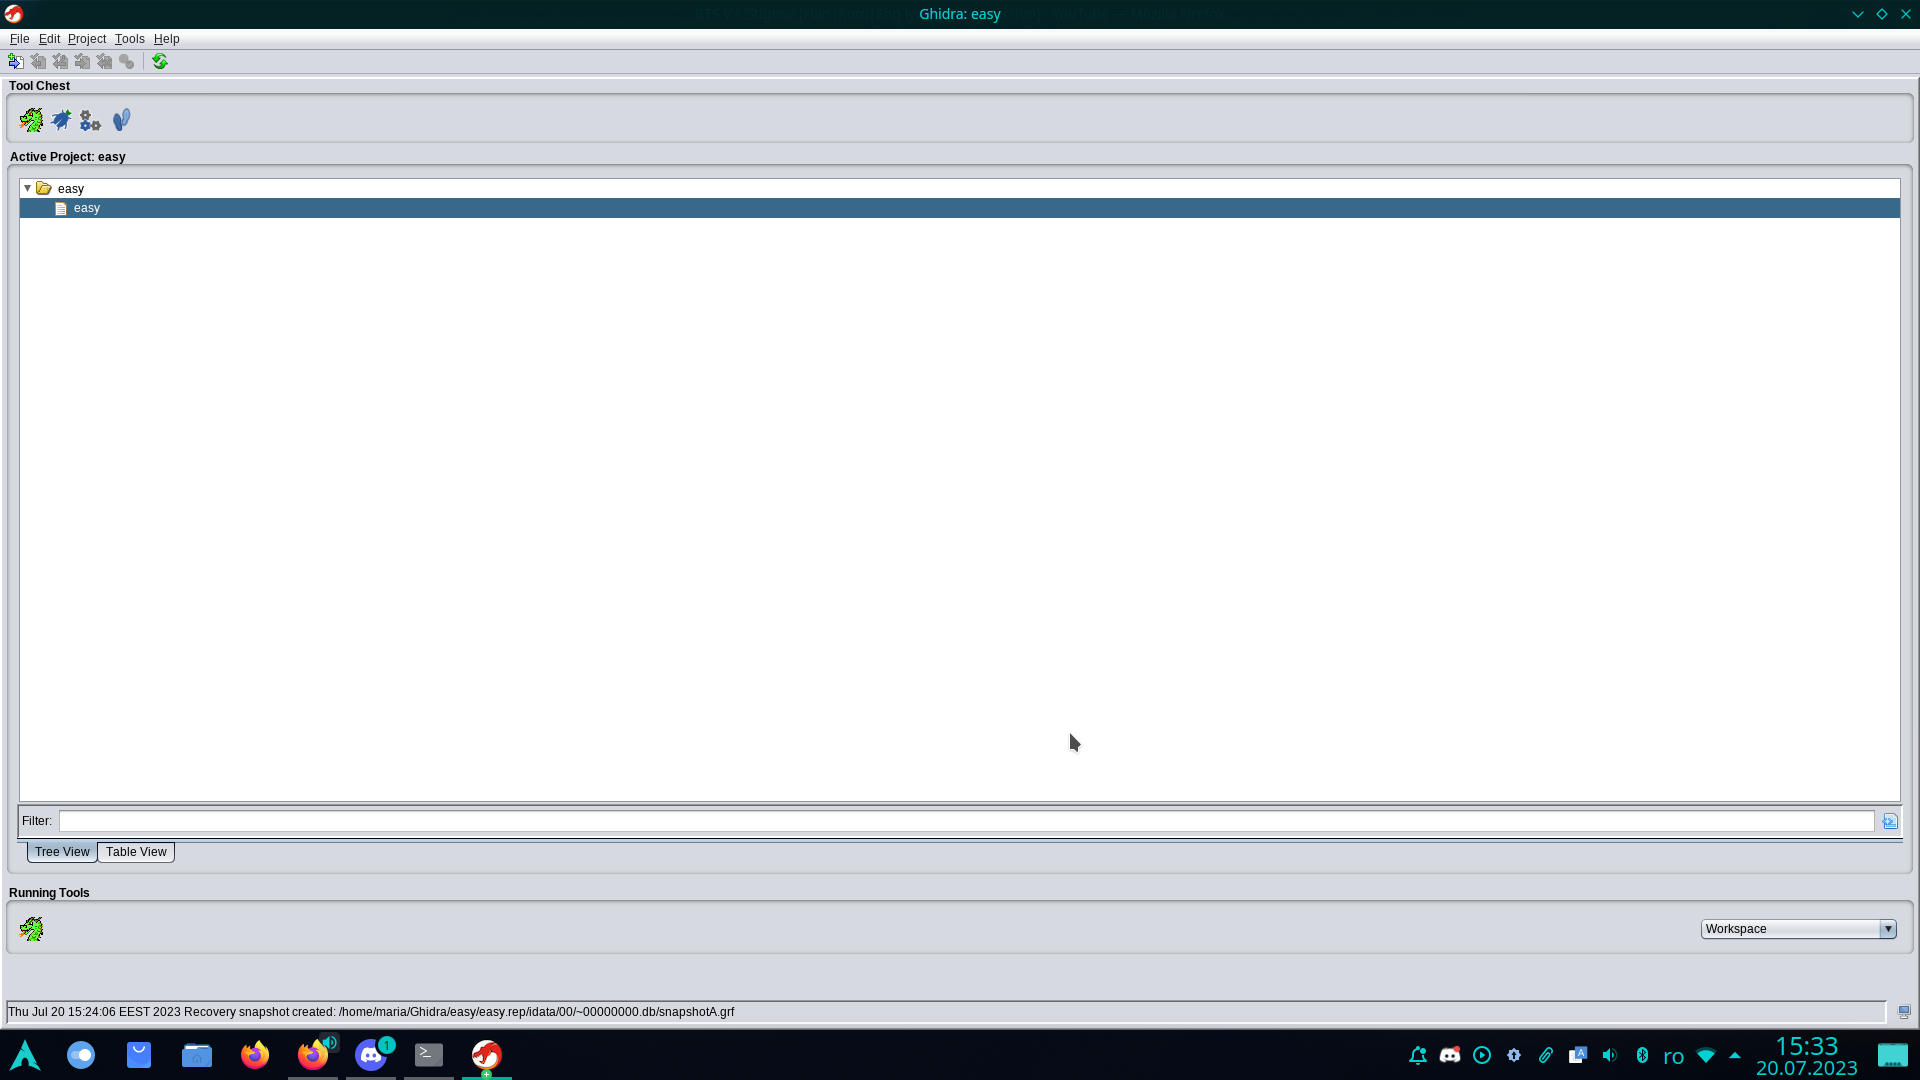
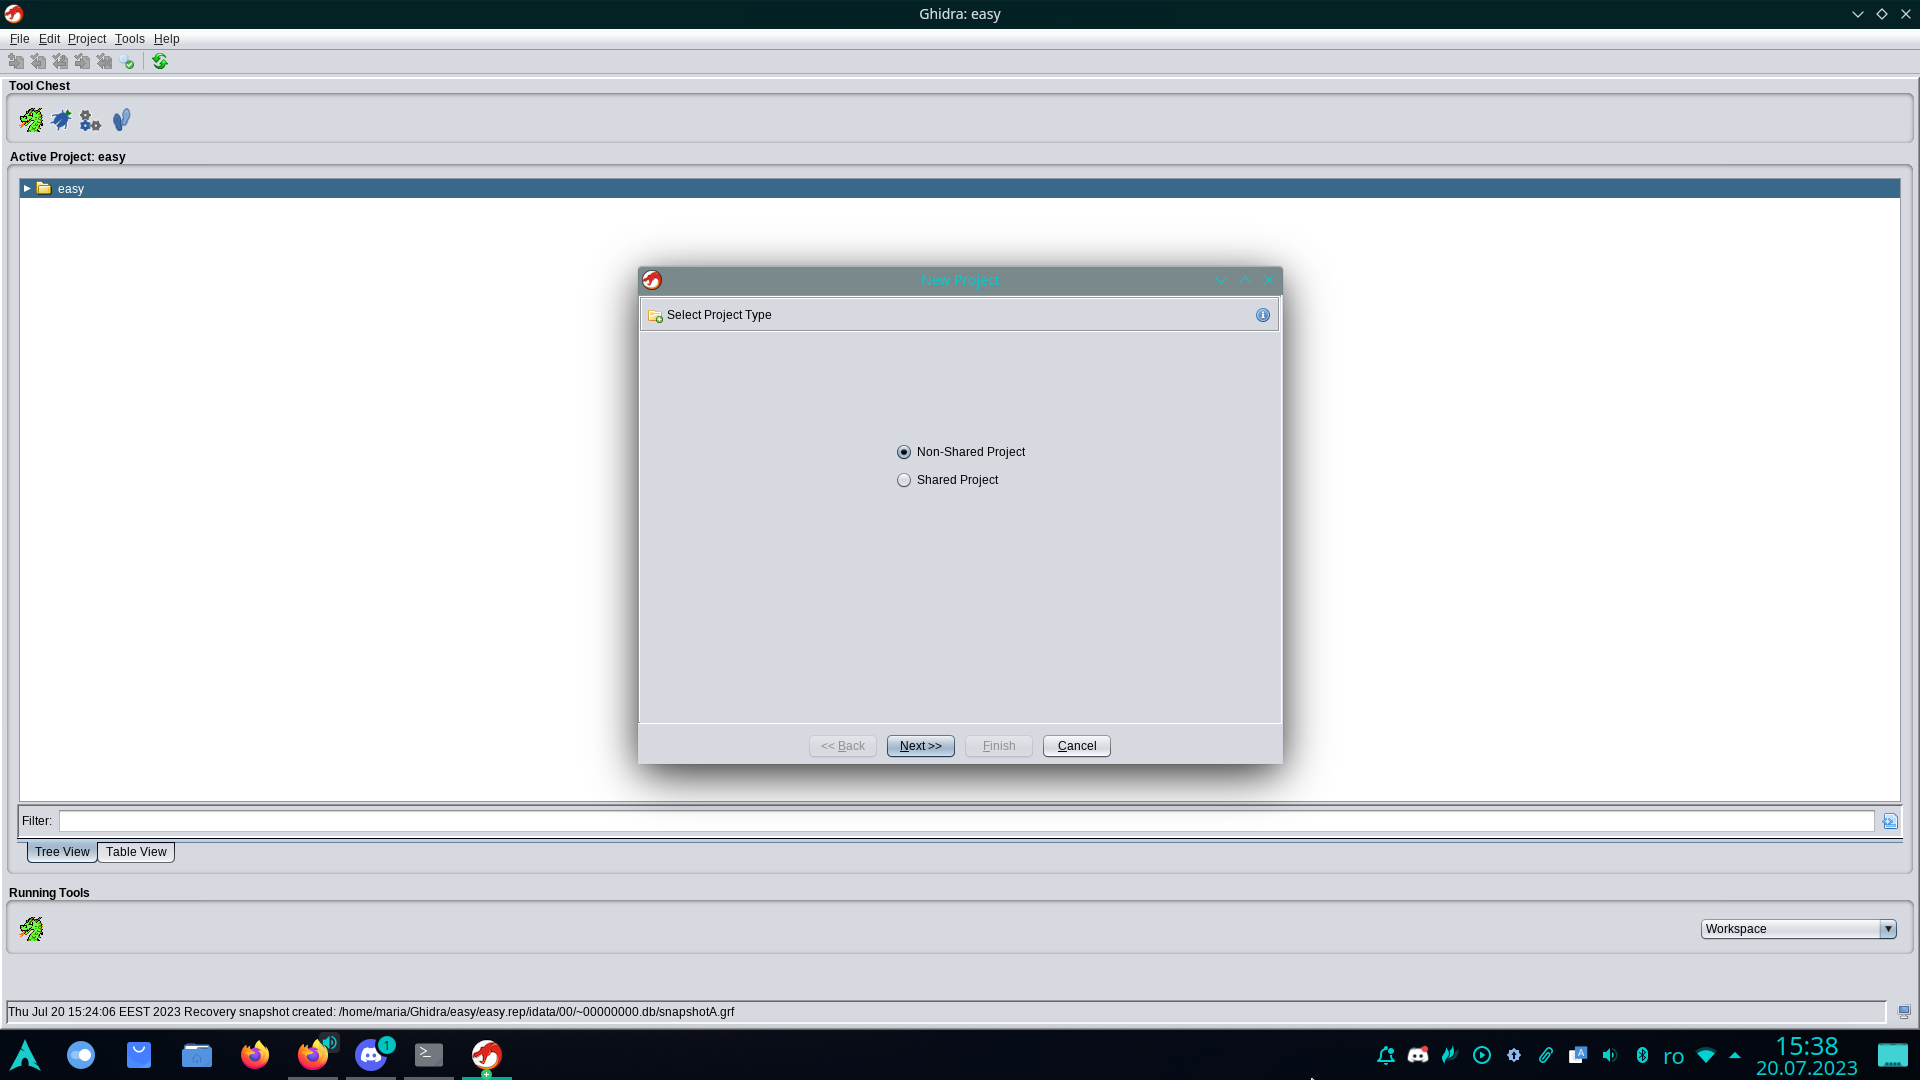
We can create a new project and give it a suitable name.
To do this, we will use: File → New Project (or using the keyboard shortcut CTRL + N).
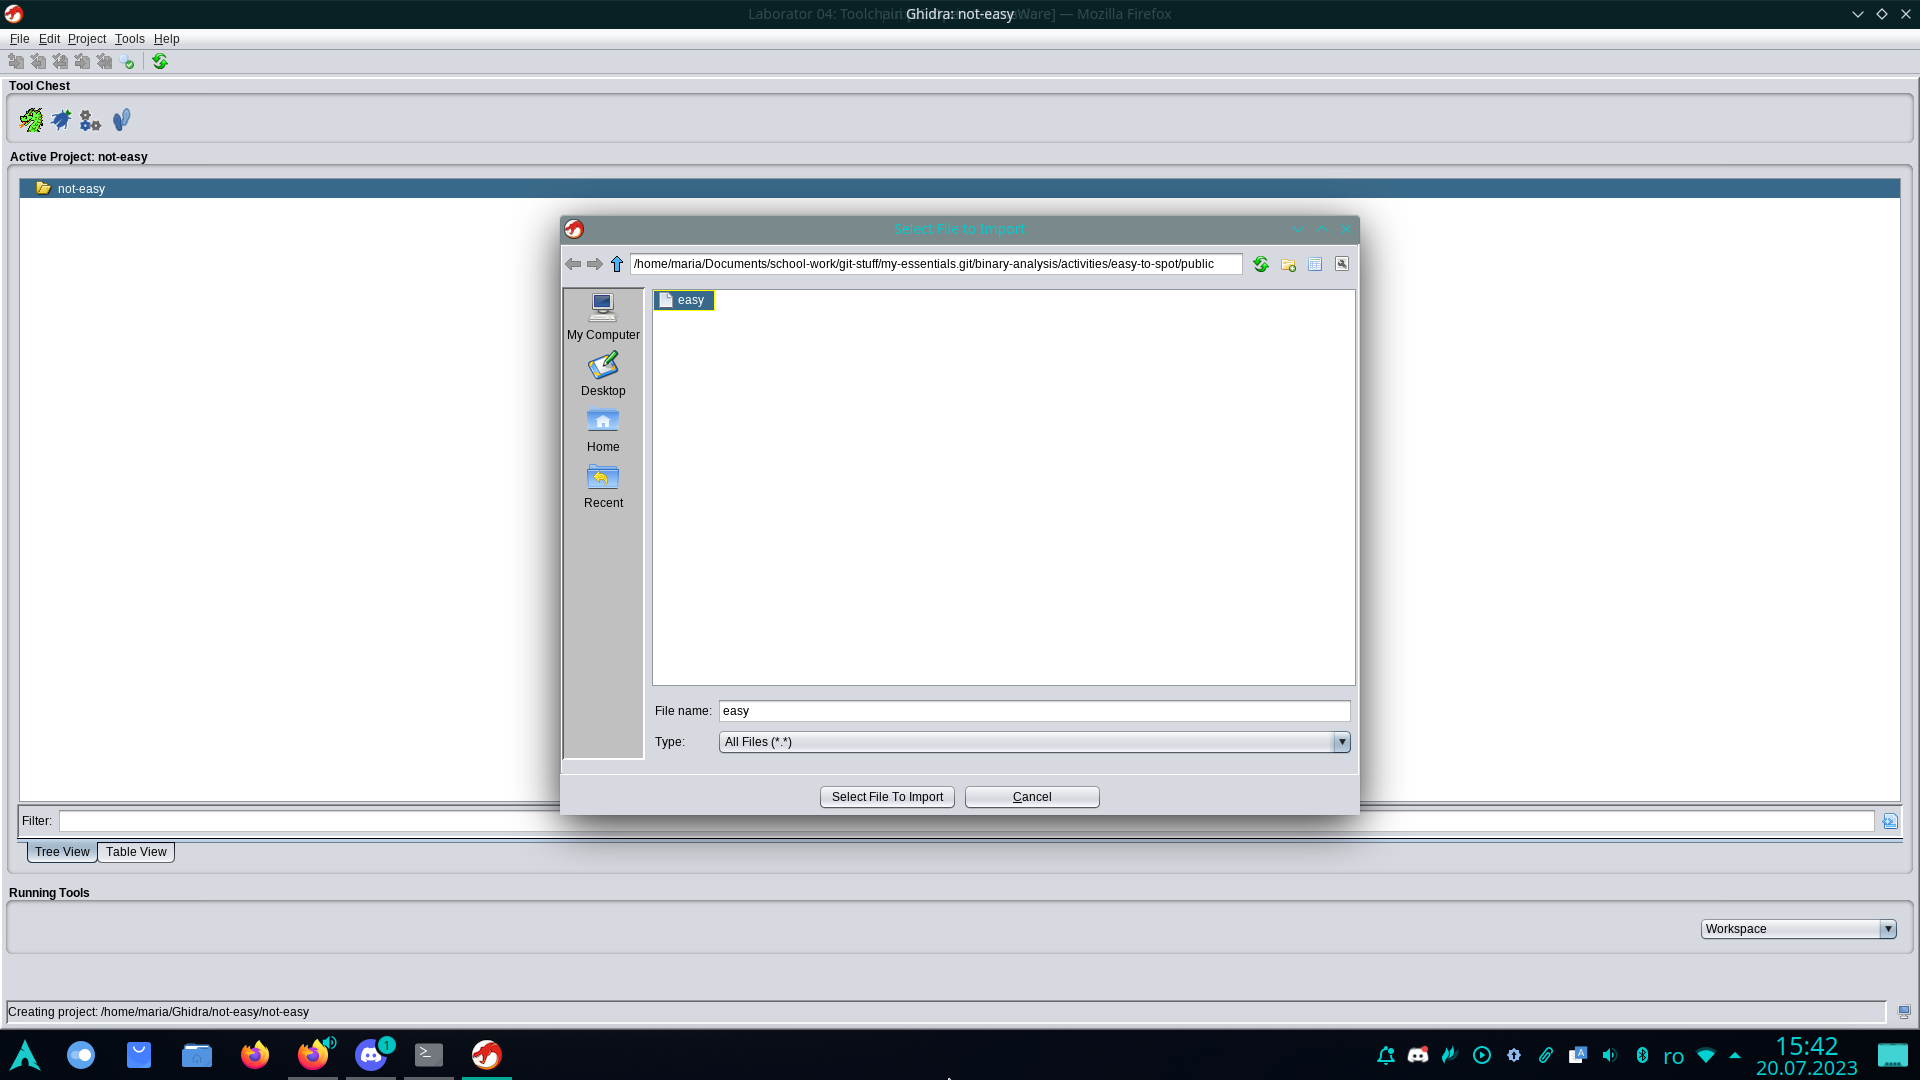
After creating the project, to add the executable file, we can use File → Import file, or drag the file into the directory we created.
Ghidra will suggest the detected format and the compiler used.
In more special cases, we may need to change these configurations, but for the purpose of this tutorial, Ghidra's suggestions are perfect.
The next step is to analyze the imported binary.
We can double-click on it.
Ghidra will ask us if we want to analyze it.
To do this, we will click Yes and then Analyze.
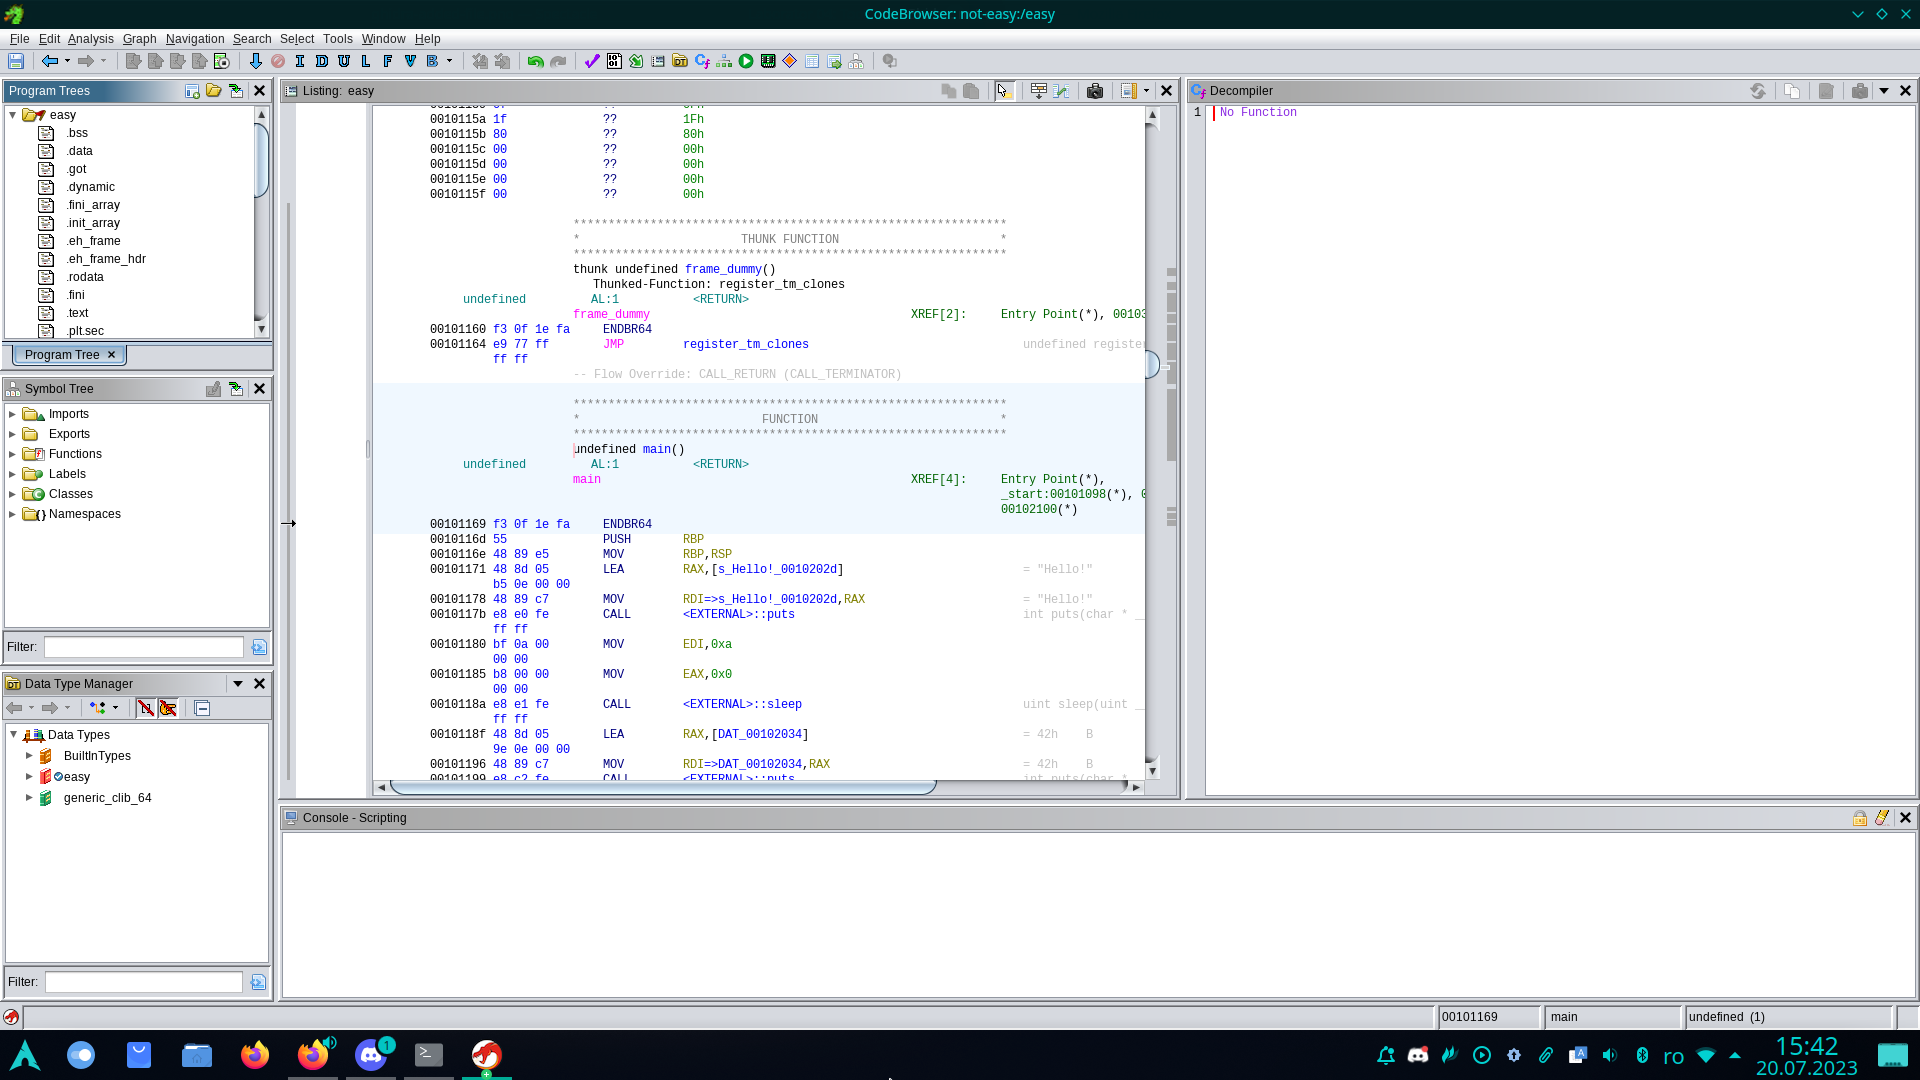
After the executable has been analyzed, Ghidra displays an interpretation of the binary information, which includes the disassembled code of the program.
Next, for example, we can try to decompile a function.
In the left part of the window, we have the Symbol Tree section;
if we open Functions, we can see that Ghidra has detected certain functions, including the main function in the case of this binary.
Therefore, if we double-click on main, the decompiled main function appears on the right, and in the central window, we see the corresponding assembly code.
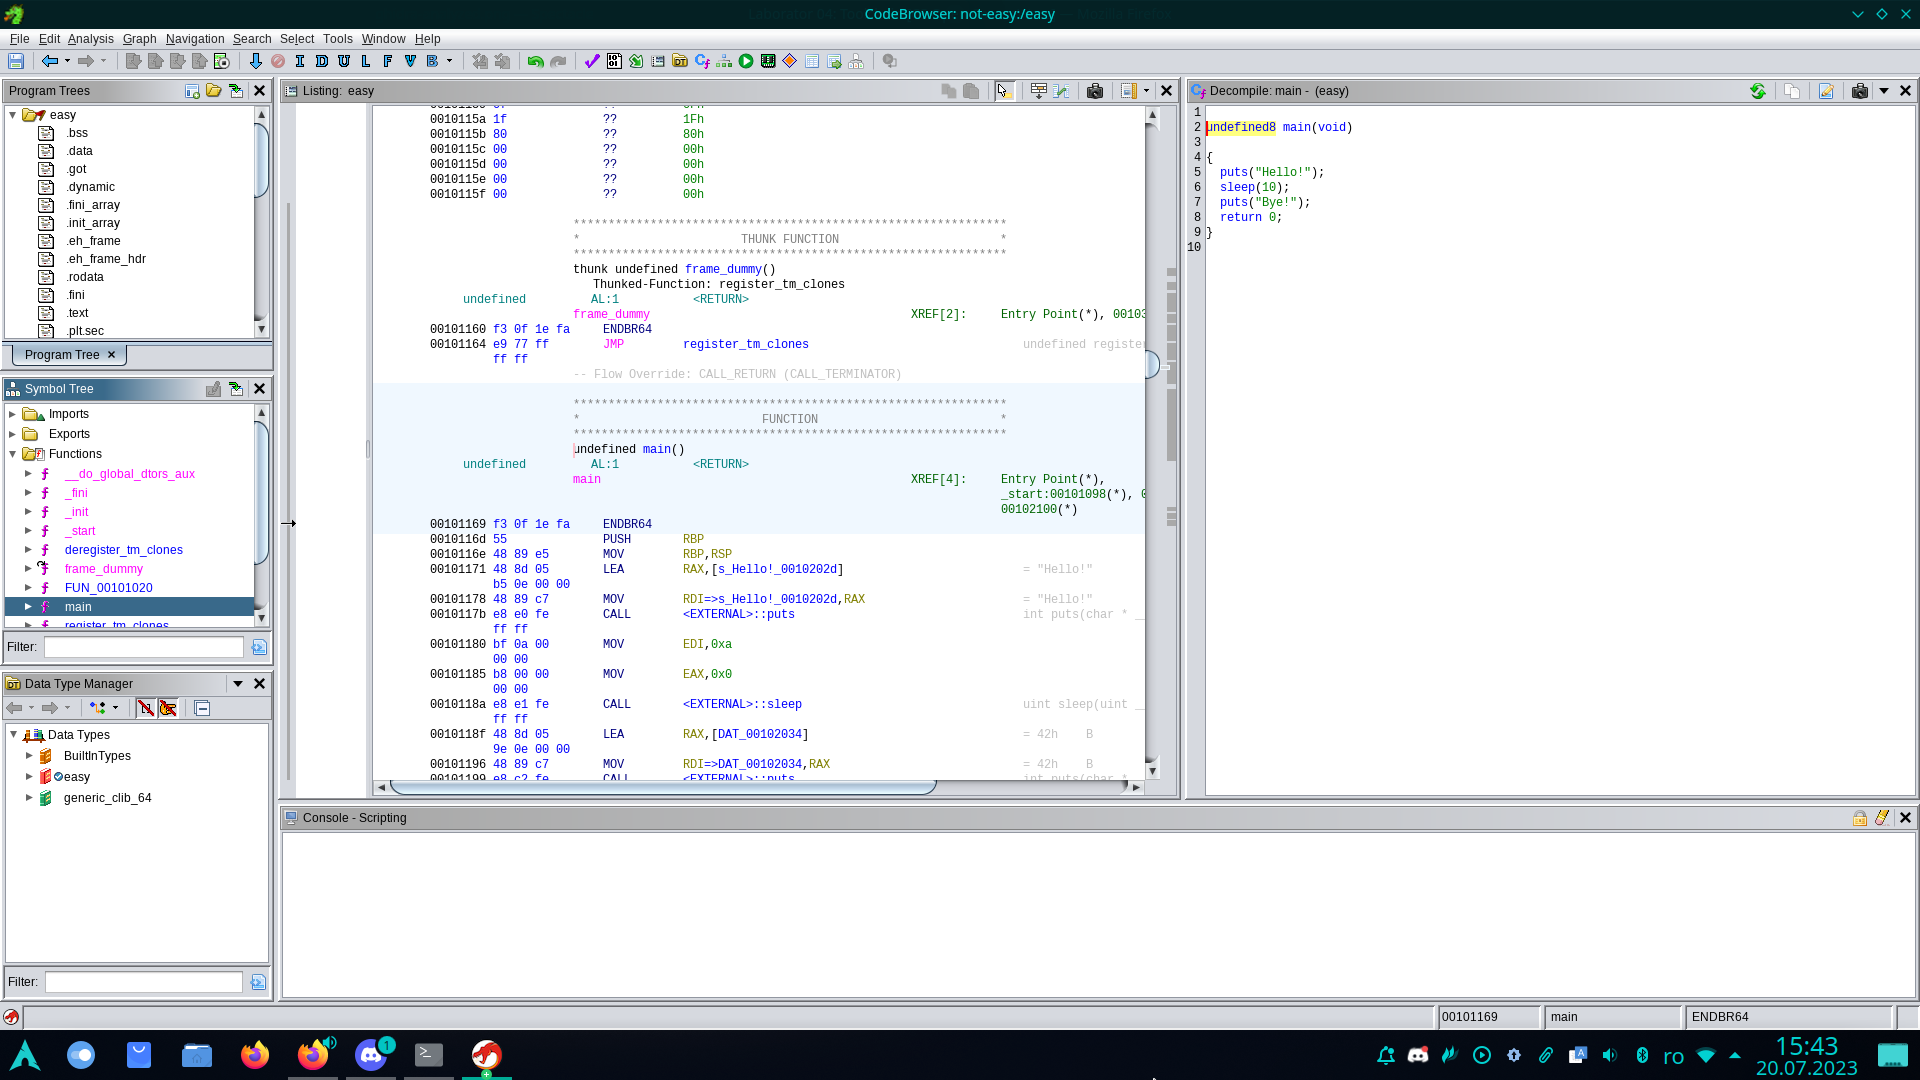
We will notice that the decompiled code is not an exact representation of the source code from the file crackme.c, but it gives us a fairly good idea of how it works and looks.
Looking at the decompiled code, we notice that the main function has two long-type parameters named param_1 and param_2, instead of the normal prototype main(int argc, char *argv[]).
The second parameter of main is of type "vector of pointers to character data" (which is generically interpreted as "array of strings").
Below is a generic perspective on how the vector is represented for a 64-bit system.
In the representation on the second line, argp should be understood as char *argp = (char *)argv in order for the calculation argp + N to make sense.
| argv[0] | argv[1] | argv[2] |
|---|---|---|
| argp | argp + 8 | argp + 16 |
The difference in parameter types of the main function is due to interpretation: the binary is compiled for the amd64 architecture (which is an extension of the x86 architecture for 64-bit systems), and the size of a
processor word
is 8 bytes (or 64 bits).
The size of a processor word is reflected in the size of a pointer and also in the size of a single parameter (if the parameter is smaller than a word, it is automatically extended to the size of a word).
Additionally, by coincidence, the size of a variable of type long is also 64 bits (the sizes of
data types
in C are not well-defined, only some lower limits for data types are defined).
This causes the interpretation of both parameters as long, as all parameters, regardless of type (int or pointer), are manipulated identically.
The calculation param_2 + 8 is used to calculate the address of the second pointer in the argv vector (that is, argv[1]).
For a program compiled for the 32-bit x86 architecture, the address of argv[1] would have been param_2 + 4.
Using the information from the decompiled code, we can infer that the program expects a password as an argument, and it must be 8 characters long, with the character at position 3 being 'E' (the first character is at position zero).
